.png)
What Is the Proper Compaction Process for Crushed Stone Paver Base?
Published on:
June 3, 2026
Pavers rarely fail because of the pavers themselves. Most problems start underneath.
Cracked patios, sinking driveway edges, and walkways that shift after one heavy rainy season usually come back to the same issue: a poorly built base. Maybe the crushed stone was rushed, maybe it was not compacted properly, or maybe the foundation was covered before anyone checked if it was truly stable.
A strong crushed stone paver base is not complicated, but it does require patience and the right process. The real work happens before the first paver is ever placed. If the base is done right, the surface lasts for years. If it is done wrong, problems show up fast.
This guide covers the full process step by step, focusing on practical field work, not just the textbook version.
Before Anything Goes Down, Deal With the Subgrade
Start by removing everything that does not belong there, including topsoil, roots, and organic material. What needs to be compacted is solid native mineral soil, not a layer that will break down and settle later.
Subgrade compaction is just as important as compacting the crushed stone base. If the soil underneath is weak, the entire surface will eventually shift.
Moisture also matters. Soil that is too dry will not compact properly, and soil that is too wet becomes unstable. The goal is slightly damp soil that holds together when squeezed but does not feel muddy or slick.
For most residential paver projects, the subgrade should be compacted to about 95% of maximum dry density before adding the stone base. Getting this step right is what prevents future sinking and cracking.
The Aggregate You Pick Changes Everything
Not all crushed stone works the same way under compaction. For a strong crushed stone paver base, you need angular, well-graded material with fines included, not rounded gravel or decorative stone.
The sharp edges lock together during aggregate compaction, creating a stable base instead of loose material that shifts over time. The fines, which are the smaller dusty particles, fill gaps and help bind everything together.
Clean, single-size washed stone may look good, but it does not compact well and should only be used for drainage. For most paver projects, ¾" crusher run or processed gravel is the best choice.
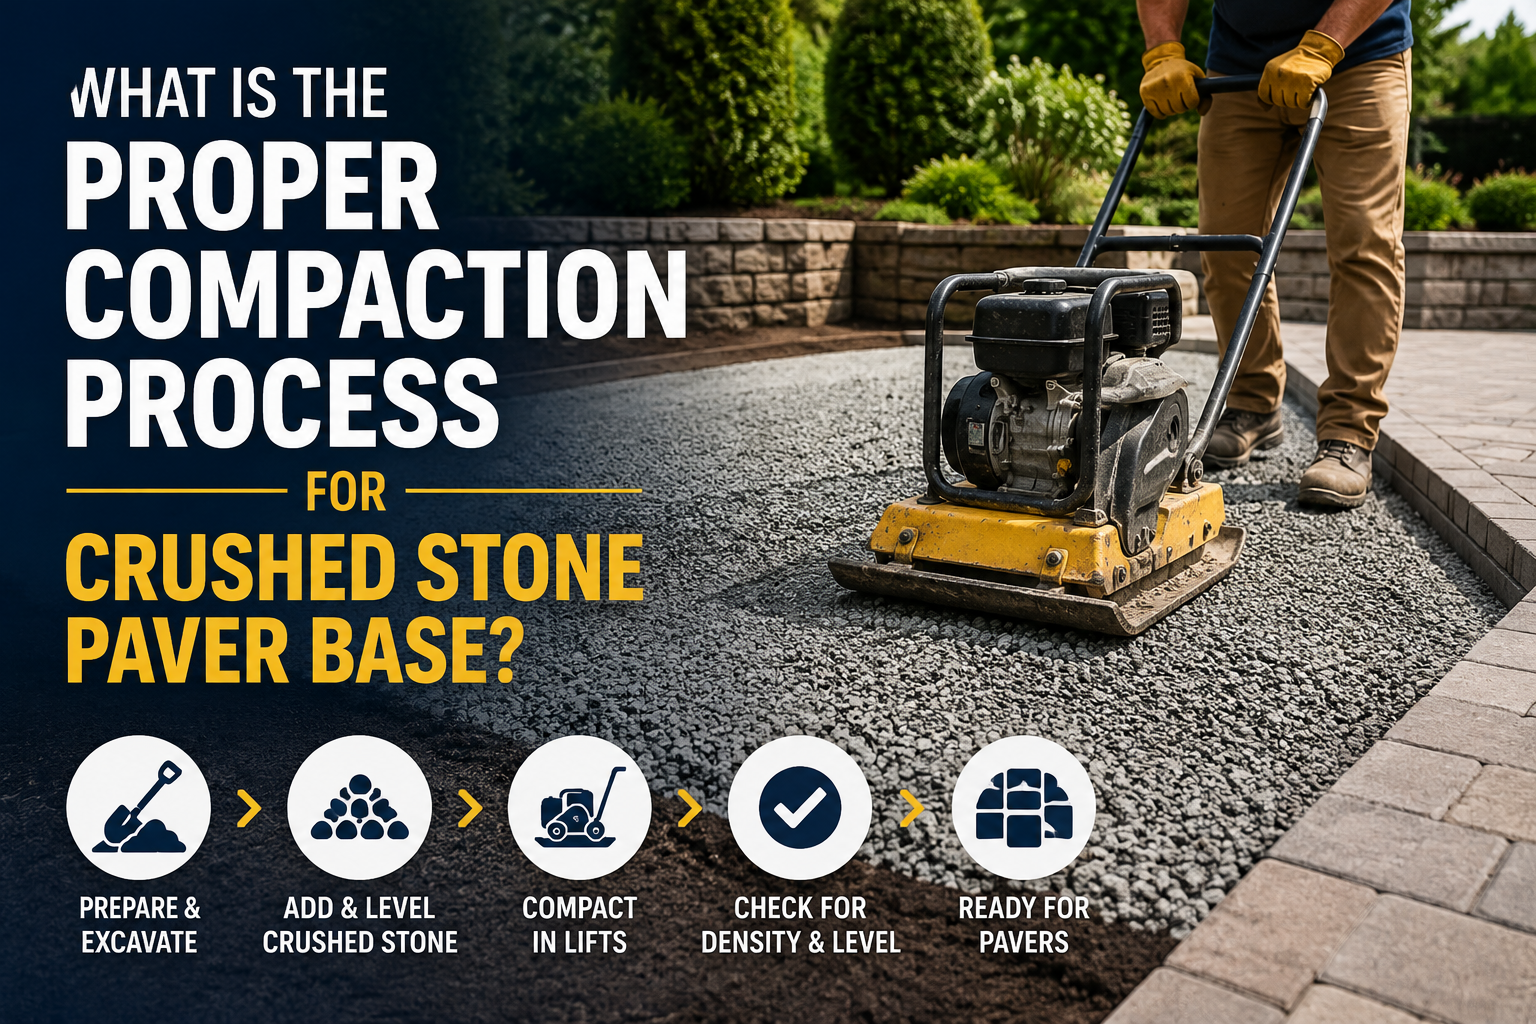
Lift Thickness — This Is Where Most Jobs Go Wrong
If there's one thing I'd want every installer to actually understand, it's this: you cannot compact deep material all at once and expect good results through the full depth.
Compaction energy from a vibratory plate compactor penetrates maybe 3 to 4 inches into granular material. Below that? The machine doesn't reach. You end up with a firm top crust and loose material underneath, which will eventually settle under load, no matter how many passes you run on the surface.
The answer is lift thickness — meaning you add and compact material in layers rather than all at once.
For a plate compactor on residential work: 3 to 4 inches of loose material per lift. For roller compaction on bigger jobs with heavier equipment, you can push to 5 or 6 inches, depending on roller weight. But on the typical patio or walkway project, stick to 3 to 4 inches.
So if you need a 6-inch compacted base, that's a minimum of two lifts. Each one is fully compacted before the next goes on. It takes longer. That's the point.
Strong pavers start with a solid base and the right stone.
Get the Right Base Material Today
Plate Compactor or Roller: Which One and When
For most residential paver projects, a vibratory plate compactor is the best choice. It works well on crushed stone, handles tight corners easily, and gives strong compaction density without being excessive.
When using one, overlap each pass by about 6 inches so no areas are missed. Run passes in one direction, then repeat in the opposite direction for even aggregate compaction. Near walls and edges, a reversible plate compactor offers better control than a forward-only machine.
Roller compaction is better for driveways, large commercial areas, or bigger bases where a plate compactor would take too long. Light-duty walk-behind rollers work well for thinner lifts, while ride-on rollers are rarely needed for residential work.
Also, more passes do not always mean better results. After about 6 to 7 passes, extra compaction usually adds little benefit and can even break down the stone. When the machine stops sinking and starts moving smoothly across the surface, the base is usually compacted enough.
How Many Passes, Realistically
There is no fixed number for every job, but 4 to 6 compaction passes per lift is a good standard for most residential paver base work.
Start with 2 to 3 passes across the full lift, making sure rows overlap. Then check the surface. It should feel firm, with no visible movement when you step on it and no bouncing from the compactor.
If it looks solid, run 2 more passes in the opposite direction. When the compactor starts moving smoothly across the surface instead of working into it, you have likely reached full compaction. Then add the next lift and repeat.
Field Density Testing
For small patios, a firm surface and experience are often enough. But for driveways, commercial projects, or heavy-load areas, field density testing gives real proof that the base is compacted properly.
Common methods include nuclear density gauges for quick moisture and density readings, sand cone tests for reliable manual checks, and Clegg impact testers for spotting soft areas.
The goal is usually 95% to 98% of maximum dry density (MDD) for a strong structural paver base.
Setting Up for the Pavers
Once the crushed stone base is fully compacted, add about 1 inch of coarse concrete sand and screed it flat. Do not compact this layer. It should stay loose so pavers can be adjusted during installation.
After the pavers are placed, run the plate compactor again with a rubber pad attached. The pad protects the surface and helps prevent cracks, especially on natural stone or thinner concrete pavers.
Mistakes You Won't See Until It's Too Late
Mud pockets form, and density readings are misleading
No density check before covering up
You genuinely don't know what you built
Wrapping Up
A strong paver surface always starts with a strong base. Good compaction work may stay hidden, but it is the reason patios, driveways, and walkways stay level and stable for years.
Using the right lift thickness, proper compaction passes, and angular crushed stone makes a big difference. Small steps during base preparation prevent costly repairs later.
That is where Western Materials helps. With properly graded base aggregate and reliable material for structural paver projects, we make it easier to build a base that lasts.
Avoid future cracks and settling by starting with properly graded aggregate.
Contact Us Now
FAQs
Q1: How thick should a crushed stone paver base be?
For patios and walkways, 4 to 6 inches of compacted base is standard. Driveways usually need 8 to 12 inches, depending on vehicle load and soil condition. Western Materials can help you choose the right amount and type of base aggregate for your project.
Q2: When do you need a Proctor compaction test?
Mostly for commercial or engineered projects. It helps measure maximum dry density (MDD) and optimum moisture content (OMC). For residential jobs, understanding moisture and proper compaction is usually enough.
Q3: Can a hand tamper replace a plate compactor?
Only for very small repairs. For patios, walkways, or driveways, a plate compactor is necessary because it creates stronger and deeper compaction than a hand tamper can provide.
Q4: How do you know the base is compacted enough?
The surface should feel firm with no flex underfoot. If the compactor moves smoothly without sinking or kicking up stone, the base is usually compacted properly.
Q5: What crushed stone works best for a paver base?
Angular crusher run or processed gravel with fines is best. It locks together well and compacts properly. Western Materials provides properly graded base aggregate for strong, long-lasting paver installations.
Materials management and founders
have produced and supplied high quality
sand and gravel to contractors &
aggregate users across California.
.svg)


